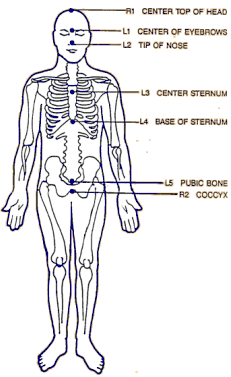
Figure 1a Diagram shows hand positions used to administer
self care described in Figure 1b. R1 refers to Right Hand position in Step1. L1
is the Left Hand position in Step 1, L2 is the Left Hand position in Step 2, and so on. Source: Jin Shin Jyutsu Insitute *.
.
Figure 1b. gives
the directions for a self care “recipe”. There are
six steps that move the hands according to descriptions below and follow the
illustration in Figure 1a.
Step 1: Place the fingers of the right hand on the top
of the head (where they will remain until step 6). Place the fingers of the
left hand on your forehead between your eyebrows. Hold for 2 to 5 minutes
or until the pulses you feel at your fingertips synchronize with each other.
Step 2: Now move the left fingertips to the tip of the
nose. Hold them there for 2 to 5 minutes, or until the pulses synchronize.
Step 3: Move the left fingertips to your sternum (center
of your chest between your breasts). Stay there for 2 to 5 minutes, or until
the pulses synchronize.
Step 4: Move your fingers to the base of your sternum
(center of where your ribs start, above the stomach). Hold them there for
2 to 5 minutes, or until the pulses synchronize.
Step 5: Move your fingers to the top of your pubic bone
(above the genitals, center). Stay there for 2 to 5 minutes, or until the
pulses synchronize.
Step 6: Keep your left fingertips in place and move
your right fingertips to cover your coccyx (tailbone). Hold for 2 to 5 minutes
or until the pulses you feel at your fingertips synchronize with each other.
Notes: The right hand remains on the top of the
head while the left hand moves down the body until the final step. The practice is typically performed while lying flat, using
pillows as necessary to maintain comfort. General instruction
regarding the breath during the self care practice is to envision the breath
inhaling up the back of the spine/body and exhaling down the front of the
spine/body.
* Jin Shin Jyutsu Institute, www.jinshinjyutsu.com