 21stcenturymed.org
Self Help Acupressure for
Flu/Immune System
C. Mason, CMT, Ph.D.
Source: Critical Labels Workshop with Jill Holden, San
Francisco, CA.
These are 2 fast recipes Acupressure Self Help for flu/immune
system. Each step
tells you what to do with the left hand and the right.
Use these recipes
as much as you need. Beginners might want to read
the General
Directions
THE PERSONAL ANTIBIOTIC
Step 1 Left hand: hang
your hand over crook of the left neck/shoulder
this
is at the back of the neck muslces that is also the top of the
left shoulder - feel free to massage
or
explore this area before you settle into a nice position
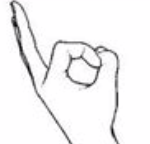
Right Hand: Thumb over index
fingernail making the ok sign.. hold 2 minutes or so.
do the ok sign with each of your
fingers in sequence... index, middle, then ring finger, then
little finger,
hold each one for 2 minutes or so. These positions are
called 'mudras'.
-ok sign: Palm of thumb contacts nail on finger. 
Step 2 Left
Hand: stay in same spot as Step 1
Right Hand: Right hand moves to right breast
midway
between the nipple and collarbone, and midway
between the
breast bone and outer chest
Steps 3 and 4 repeat the same
thing on the other side
Step 3 Right hand: hang your
hand over crook of the right neck/shoulder
this
is at the back of the neck muscles that is also the top of the
right shoulder - feel free to massage
or
explore this area before you settle into a nice position
Left Hand: ok sign with Thumb over
index(2 min), middle
(2min) ring(2min), little(2min) fingers, in this order.
Step 4 Right
Hand:
same position as in Step 3
Left Hand: Left hand moves to left breast
midway
between the nipple and collarbone, and midway
between the
breast bone and arm pit
LYMPH MASTER
(although
this involves holding only left side, works on both)
Step 1 Right hand: hang your hand
over
crook of the right neck/shoulder
this
is at the back of the neck muslces that is also the top of the
right shoulder - feel free to massage
or
explore this area before you settle into a nice position
(for practitioners, this is RH L11/3 )
Left hand: goes to the left small of back,
over the
kidney area, above waist and on rib cage
Step 2 Right
Hand:
same as step 1
Left Hand: Left hand contacts the left hip
crease,
where the leg meets the torso, just beside or on the pubic
bone
Step 3 Right Hand: Left
inside ankle, behind the ankle bone, near the achilles tendon
Left
Hand: Same position as in Step 2
